Replacing an Electrical Outlet
Replacing an electrical outlet is a very easy thing to do. Once you know how to safely change out an electrical outlet you will be able to use your expanded knowledge to other electrical procedures because you know how to change out an electrical receptacle.
 Eight Tamper Resistant GFCI outlets
You will be able to use your expanded knowledge to do the following:
- replace electrical outlet
- replace outdoor outlet
- loose outlet fix
- replace two-prong outlet
- changing a dimmer switch
- replace GFCI breaker outlet
- change light switch to dimmer
- replace a wall switch
All of these items require that you perform the same type of actions required of replacing an electrical outlet. You will need to disconnect power, identify the wire connections, perform removal and reconnection of the wires.
The tools needed for the job
The tools needed for this job are mostly basic. You will need a number two Phillips screwdriver, a quarter-inch straight screwdriver, needle nose pliers, wire cutters, a pocket screwdriver, and a wire stripper. The wire stripper is the only non-basic tool that is used. It can make the job of removing the insulation very easy. But if you don’t want to use a wire stripper you can use a sharp knife to score the insulation and use the needle-nose pliers to pull the insulation from the wires.
Many names
There are many names for this part, electric receptacle, outlet, receptacle, wall plug, wall socket, electric outlet, and duplex receptacle. But whatever its name it is also one of the most dangerous things that a homeowner is ever going to work on.
Safety
The danger lies in the electrical power that is coming to that outlet. So always think safety first. Disconnect the power. Verify that no power exists at the outlet before starting to work on it.
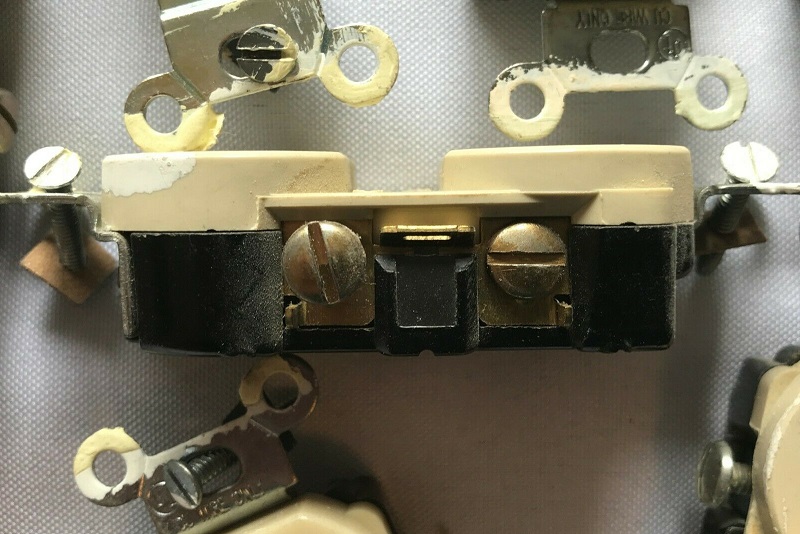
Some outlets have different power sources for each plug on the outlet. You can identify these types of outlets by the broken tab at the center of the outlet terminal screws. Here is a short video for more information on how this done…
So let’s begin by rounding up a working electrical device. I like using a corded hand drill. You can hear the thing running when it is under power. A hairdryer, a corded garden blower can also be used. All of these devices are loud when running so if you are working by yourself you can hear them go off when you throw the right circuit breaker. You will need to plug the device of your choice into the outlet and turn on the device.
At the circuit breaker box
With your chosen device running proceed to the main power panel and throw the circuit breaker for that outlet. You should hear the device shut down.
Don’t know which breaker controls the outlet and they aren’t labeled?
Look for circuit breakers with a 15 or 20 amp rating. All outlets are located in circuits rated for one of these amp draws.
Ok, so you think that the power has been disconnected. Next, verify that the device of your choice is still working and did not suffer a coincidental failure by plugging it into another outlet not on the same circuit as the one you’re going to work on. With the power safely disconnected you can begin by removing the cover.
One, two, maybe three cables
Normally household outlet receptacles will be wired in one of two ways. If the outlet is located anywhere but at the end of the circuit, there will be two cables(don’t be surprised if there are three) entering the electrical box. One cable is bringing power into the box, while the other cable(s) are carrying power to other outlets or fixtures. If the box is at the end of the circuit then there will be one cable going into the box.
Pulling the outlet from the box
Use a flat blade screwdriver to remove the screw(s) for the cover plate. Then with a #2 Phillips screwdriver or a flat blade screwdriver loosen up and remove the mounting screws at the top and bottom of the outlet. These screws usually have a small piece of thick paperboard attached to the screws between the outlet and the electrical box. This small piece of paperboard serves as a retainer keeping the screws from falling away from the outlet.
 Closeup of mounting screw and retainers
The outlet can be pulled out of the electrical box while still connected to the wires. Grab it at the top and bottom mounting screw locations and pull it straight out.
Plugged in or screws
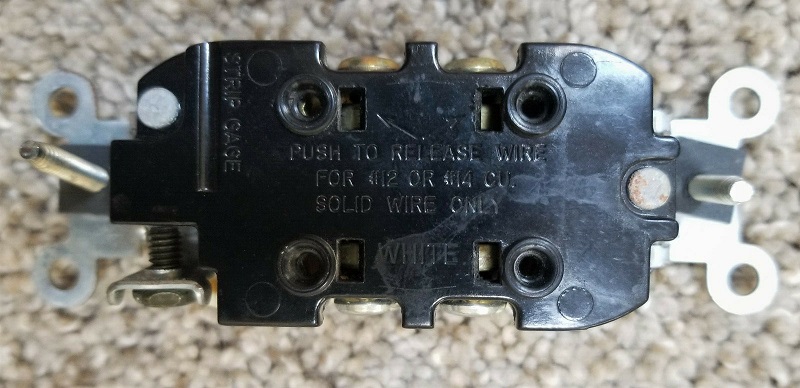
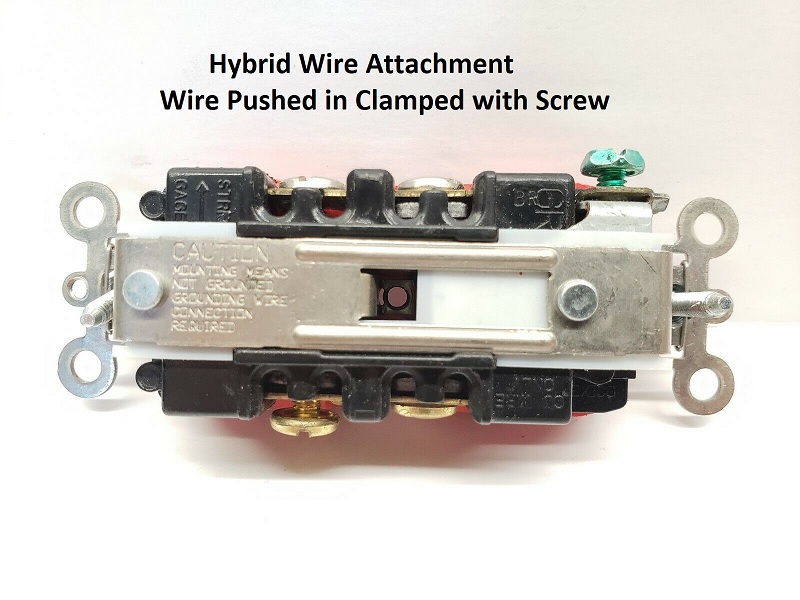
The wires can be connected to the outlet in one of three methods. They can be plugged into the back of the outlet(held in place with spring tension) or using a hybrid method they can be plugged into the back of the outlet and clamped in place by the screws. The last method has the wires wrapped around the screws at the sides of the outlet. Which method are you working with for your outlet?
Wire attached to the screws
The important things to take away from this video
- There are three wire types connected to the outlet. Hot, neutral, and ground wires.
- The hot wire connects to the brass-colored screw
- Wrap the wires clockwise around the screws
- Close the wire loop before tightening the screw
- Make sure the screw is very tight on the wire
- Make sure any unused terminal screws are tightened(not mentioned in the video)
Wires plugged into the back of the outlet
- Insert a pocket screwdriver into the slot next to the wire to release it.
- If the wires can’t be released cut the wire at the receptacle.
- Strip off a small amount of insulation(look for the wire strip guide on the outlet not mentioned) on the cut wire for reinserting into the outlet.
- There are two types of outlets, 15 amp, and 20 amp outlets.
- A 15 amp outlet uses 14 gauge wire and a 20 amp outlet uses 12 gauge wire if the wire doesn’t fit the push in then you have a 12 gauge wire and a 15 amp outlet.
- The neutral wire attaches to the backside of the outlet where the silver-colored terminal screws are located.
- Connect the ground wire with the hoop in a clockwise direction.
- Connect the hot wire to the brass-colored terminal screw side of the outlet.
- Always check that the connectors in the outlet have a good grip on the inserted wires by trying to pull out the wire(not shown or mentioned in the video).
- The larger slot in the face of the outlet is for the neutral wire. The smaller slot is for the hot wire.
- During installation fold the wires neatly into the back of the box.
- Make sure the ground wire does not touch any of the terminal screws.
- Make sure any unused terminal screws are tightened(not mentioned in the video)
- Tighten the outlet mounting screws until the outlet can no longer move.
One last thing
You’ve completed replacing an electrical outlet, but there is one last thing to do. This is a little tip that will make any future work on that outlet easier the next time. The circuit breaker you used for this repair is usually numbered in the main panel. Using a permanent marker I like to write that number on the inside of the cover plate. Then should I need to disconnect power again at that outlet for any reason, I remove the cover plate and know instantly which circuit breaker needs to be thrown.
(Mybusyretiredlife.com All Rights Reserved)
(Mybusyretiredlife.com All Rights Reserved)
(Mybusyretiredlife.com All Rights Reserved)
(Mybusyretiredlife.com All Rights Reserved)
(Mybusyretiredlife.com All Rights Reserved)
(Mybusyretiredlife.com All Rights Reserved)


