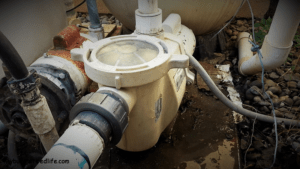
My pool pump lost prime
My pool pump lost prime. Loss of prime for the pool pump is not good. It allows the pump to run dry, without water, to cool down any moving parts in the pump. Running dry can ruin the pump seal.
The pump could not achieve prime again. That meant that the pump was sucking in air and not water. So I had to turn off the power to the pump so that it would not run. Of course, this action also stopped the chlorine feed into the pool and my pool started to get cloudy almost immediately. Not good, especially in hundred degree plus weather.
Red Flag Products 1-1/2-Inch Flapper Check Valve – No Spring, White, Socket

Ok, so where do I start looking first to fix this problem. Well, first I had to see if the pump could achieve prime by itself if it had water in the pump basket. So I get a bucket of pool water and pour it into the pump basket, close the top and start the pump. It starts pumping some water almost immediately. After a few sputters it is pumping water at full capacity. Great, the pump is not the problem. Now I shut down the pump and notice that the water is draining from the high spots in the system back into the pool very fast.
![By User:KaHe (Own work) [Public domain], via Wikimedia Commons Check_valve_swing](https://www.mybusyretiredlife.com/wp-content/uploads/2016/07/Check_valve_swing-200x300.png)
Flap or Swing type check valve
Check Valve
This is supposed to be a closed system(no air can enter the system). I also have a flap/swing type check valve installed between the pump discharge and the pool filter to prevent the water from draining back into the pool during filter maintenance.
Red Flag Products 2-Inch Flapper Check Valve – No Spring, White, Socket
I bought this type of check valve because there is only one part, no springs to rust or corrode that would cause the valve to stop working. The movement of the water opens the flap and the weight of the water pushes it closed and keeps it sealed. Most importantly, the way the valve is made up, it does not restrict the flow of water.
Conclusion
Conclusion, I have a large air leak that is allowing the water to drain back into the pool. I start at the pool pump discharge pipe and remove it to check the flap valve for debris that might keep it from closing.
The valve is not hindered in motion or by debris. I check all the glued connections for breaks or cracks and find none. Ok, time to put this discharge piping back together. I remove the Teflon tape from the threaded sections and grab my pipe sealant and fill those threads up. I install the pipe and fire the pump up before reconnecting the pump to the system.
The water fills the pipe and is draining back into the pool but at a much slower rate. Great, I believe that the remaining air leak is coming from the connections before the pump. I disconnect the pump from the inlet piping and remove any threaded connectors. A check for cracks or breaks in any of the glued connections, I find none. I check the seal condition on any of the union connectors.
Thread Sealant All Around
I remove any Teflon tape from the threads and reapply pipe sealant to all the male threaded connectors. I reassemble the piping and connect all the pump piping. The system should now be “closed” again with no way for air to enter. I fill the pump basket and start the pump. It starts to fill the system almost immediately, a good sign.
I wait until all air is gone from the return jets in the pool. The moment of truth has arrived, I shut down the pump and observe that the water in the pump basket is not going anywhere. Eureka! Success, no more air leaks. My pool pump is primed and ready for service.
Related Article: More Articles about Swimming Pools
(Mybusyretiredlife.com All Rights Reserved)
(Mybusyretiredlife.com All Rights Reserved)
