How to layout a floor
How to layout a floor starts with a tape measure and a spreadsheet. This technique will work for tile, wood, laminate, or vinyl plank floors. I created a spreadsheet that will tell me where the seams(the point where one row meets the other) will be when the floor is put together. This technique determines how wide the first row will need to be when you layout a floor’s starting point.
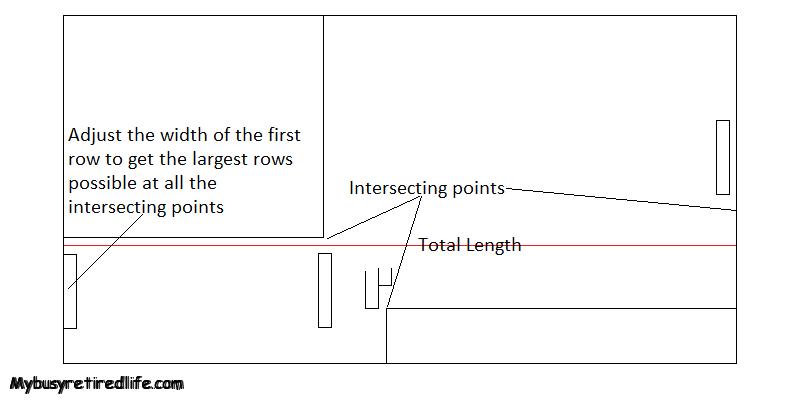
Why do you need this? Well you don’t want to have to cut a row 1/2″ wide when you’re installing your flooring. You will want the largest possible width at all these critical points. I consider this “tool” to be the most important tool when it comes to the layout and trouble-free installation of a floor.
The first piece of the puzzle
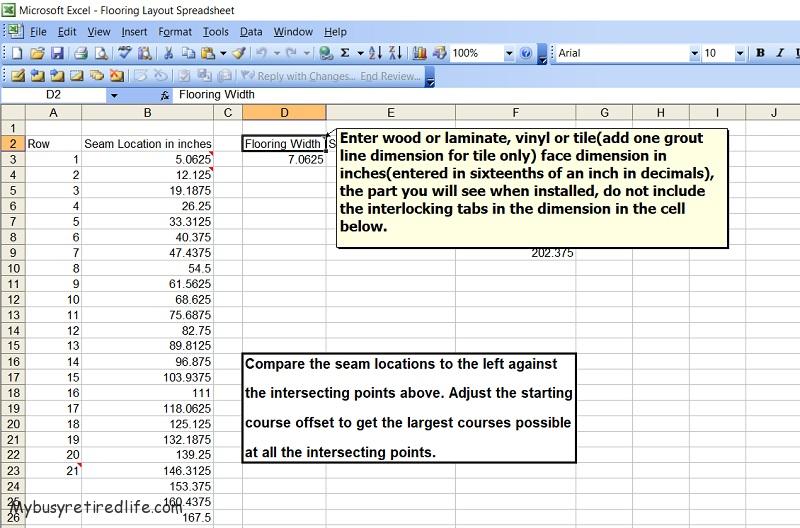
The starting point for how to layout a floor is knowing the width of the material that you are laying down. You will need a tape measure and the material you are laying down. For laminate, interlocking wood, or vinyl plank flooring material measure the face width to the nearest 1/16th of an inch(the part you will see, do not include the interlocking tabs in this dimension). For tile measure the face width and add one grout line(whatever width you have chosen). Do not round up or down on your measured number for your wood or laminate flooring face dimension. You will need your measurement to the nearest 1/16th of an inch. Ok, you have your first number.
Measure the room
Now measure the room or location where the material will be installed. You will be measuring from the starting point to any walls, or door openings, parallel to the placement of the flooring material. You can tell which ones they will be because these will need to be scribed when installing the flooring. We will call these points intersecting locations. Be sure to include the end of the installed flooring in your measurements. We will call this dimension the end dimension. Be sure to write down all these intersecting location dimensions including the end dimension. The intersecting locations can be measured to the nearest 1/4 inch increments. Great, we now have all the measurements you will need.
Table for practical inch measurements
You will need to convert your intersecting point measurements from sixteenth of an inch to decimal point numbers. Below is a table you can use.
| Sixteenth of an inch | Decimal Equivalent |
| 1 | 0.0625 |
| 2 | 0.125 |
| 3 | 0.1875 |
| 4 | 0.25 |
| 5 | 0.3125 |
| 6 | 0.375 |
| 7 | 0.4375 |
| 8 | 0.5 |
| 9 | 0.5625 |
| 10 | 0.625 |
| 11 | 0.6875 |
| 12 | 0.75 |
| 13 | 0.8125 |
| 14 | 0.875 |
| 15 | 0.9375 |
| 16 | 1 |
Why did we take down all these measurements?
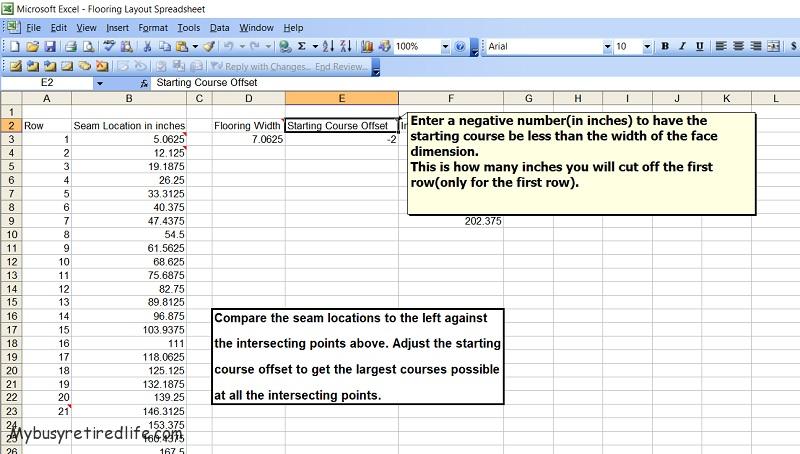
We now know what our material width is and where all the intersecting points are located along with the start and ending locations. So lets put it in a spreadsheet and find out where our seams will fall in relation to the intersecting points. What the spreadsheet will tell you is how close a seam will fall to any of these points. You don’t want any of your seams so close that you will have a seam 1/2″ away from a wall or door opening. What you will do to get away from these types of problems is to adjust the starting point of the first row by taking away material and seeing where your seams fall in relation to all the intersecting points.
Formulas for the spreadsheet
Let’s build this spreadsheet tool. If you need a spreadsheet click here. This article assumes that you know how to enter formulas into a spreadsheet. The following spreadsheet photo shows the formulas(2) needed. The rest of the numbers are those dimensions you took earlier. You really only need to enter the first two formulas then highlight the second formula and drag it down the column to fill the column with formulas. Check that your formula always points to D3 and no other cell in column D.
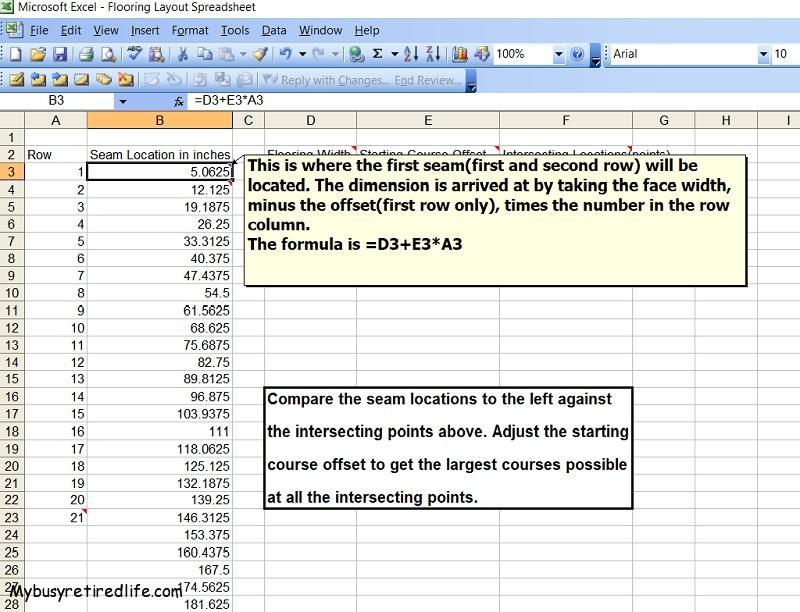
Screenshot first formula at B3 flooring layout spreadsheet
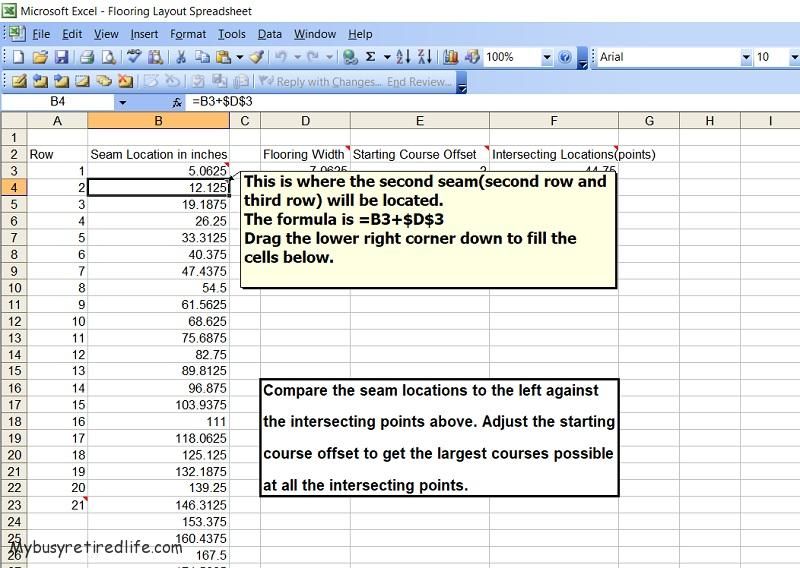
Second formula B4 flooring layout spreadsheet
Material width dimension at cell D3
Starting row width adjustment E3
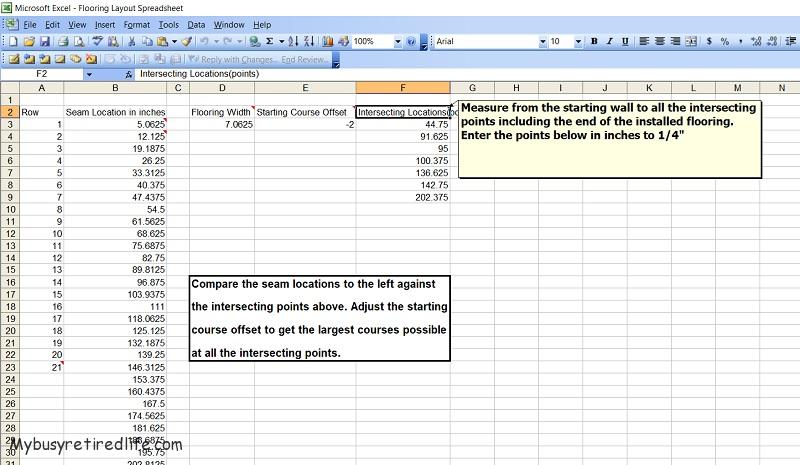
Intersecting points column starts at F3

Adjust number of rows to fit your project.
How to read the spreadsheet
Once your spreadsheet is done you can “read” the spreadsheet by comparing where each seam of your floor will be relative to your intersecting points. For example, let’s say that one of your intersecting points is at 38.5 inches. Look for numbers that are close to this dimension. You will find two numbers a before(smaller number) and an after(larger) number. Now you know how wide each row of flooring will be relative to that intersecting point. Now do this for all of your intersecting points.

How to use this spreadsheet
To close?
Are any of the numbers really close to your intersecting points? If so you may want to adjust the starting row’s dimension. Go to cell E3 and enter a negative number from zero to one inch below the width of your flooring. For example: Let’s say your flooring is seven inches wide. You can enter zero which means you will start with a full-width row. Or any number up from negative one to negative six which means that your starting row would be one inch wide.
Conclusion
You now have the most important tool you will need to layout a floor. You will not have any super thin cuts at doors and walls which will make installation that much easier. This spreadsheet will give you all the information you need to layout a floor.
Related Articles: Flooring
(Mybusyretiredlife.com All Rights Reserved)
(Mybusyretiredlife.com All Rights Reserved)
(Mybusyretiredlife.com All Rights Reserved)
(Mybusyretiredlife.com All Rights Reserved)
(Mybusyretiredlife.com All Rights Reserved)
(Mybusyretiredlife.com All Rights Reserved)
(Mybusyretiredlife.com All Rights Reserved)
(Mybusyretiredlife.com All Rights Reserved)
(Mybusyretiredlife.com All Rights Reserved)
(Mybusyretiredlife.com All Rights Reserved)
(Mybusyretiredlife.com All Rights Reserved)
Liked This Post? You May Like These:

I tried downloading the spread sheet and it does not work.
Hello Yanna,
Sorry about the broken link. The link is for spreadsheet software. I have a copy of the spreadsheet used in the article. Sorry, at the moment I don’t know how to share the spreadsheet with the proper security. The article does show you how to create a copy of my spreadsheet with the formulas used in the spreadsheet. You’re going to need spreadsheet software to recreate it.
The actual spreadsheet is only about 2 columns. Column A is how many rows your project will need. The B column is where the formula is entered. The D column has only one dimension(the face dimension of your material that you measured). If you’re working with tile be sure to add one grout line width to the tile’s face dimension(this is the only material you have to do this for). Column E is the amount(you can adjust this number) you will cut off the first row of material to achieve the largest rows possible at all intersecting locations.
If you need more help in creating your personal copy drop another comment here and I’ll try my best to help you out.
Good luck with your project.
RayC.