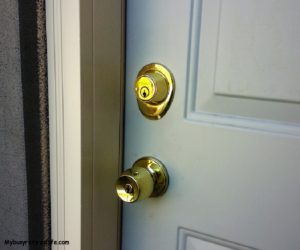
Buffing Old Brass
Buffing old brass can give you a grand sense of accomplishment. You start out with something that looks like it should hit the trash pile.  Afterward, your “trash” piece of brass looks like it just came off the assembly line brand sparkling new. Ok, so what does the average homeowner need to get great results? Surprisingly very little equipment is needed as it can be accomplished using a corded drill, buffing wheels and the proper rouge. The proper rouge for the material being buffed is essential. Click here for a chart of the materials and the rouge required for that material.
All Buffing Wheels – Amazon.com
The Buffing Old Brass Process
- Using the chart link above choose the buffing compound depending on the material to be polished.
- Apply rouge sparingly to the face of a spinning buffing wheel. Repeat as needed during the buffing and polishing.
- Use only light pressure in applying the buffing wheel to the material’s surface, you want the buffing wheel and the polishing compound to do the work.
- Keep a different buffing wheel for each compound to eliminate cleaning the buffing wheel.
- When you have completed the polishing, wash in warm soapy water to remove any excess buffing

Top deadbolt used to look like the bottom.
compound or dirt which may have accumulated. Dry with a soft wool cloth. The high luster will need to be protected from oxidation by the proper application of a clear metal lacquer.
Safety Equipment Needed
All Safety Glasses – Amazon.com
The most important thing to know when doing this job is to protect yourself. That means you need safety equipment for your eyes and your hands. The pads are spinning and can and will throw stuff at you so you will need to protect your eyes. Use safety rated eye protection. Also because your hands are very near the spinning pad during the buffing process use leather gloves to protect them. Do not wear long sleeve clothing during the buffing process.
The Right Power Tool
I used a corded drill with buffing wheels with quarter inch adapters that easily chucked into the drill. This also allowed for easy change out from wheel to buff for hard to get at locations in my locksets.
I used this kit on my corded drill. (click here) It has the rouge and buffing wheels and can do more than 4 locksets. I also used these buffing pads for hard to get at spots on the locksets.

Finished job buffed and sealed with a metal lacquer
Let the buffing wheels and rouge do the work. You don’t need to apply pressure to get the parts polished. They need a lot of rotations or rubs from the buffing wheels against the surface to get polished. Pushing the part hard against the buffing wheel will only cause the wheel to grab onto the surface. It can push it away or pull it out of your grip. This results in a very dangerous situation. Remember more time on the buffing wheel, not more pressure, will get the job done.
Seal the newly buffed brass. Brass will start to oxidize when exposed to the elements. So clean the parts with a soapy cleaner on a wrung out rag and seal with a metal lacquer.
Polishing Compound Bars For All Metals, Glass, Plastic – Amazon.com
What I Hoped To Achieve
The object of buffing old brass is to remove the tarnish. I’m not looking for perfection. I’m not looking to buff out scratches or getting the metal super smooth. I wanted the lock sets to look good and not look tarnished. My attitude was that I am not a professional looking for perfection. I want it to look good to my eyes. I think I accomplished that.
Related Article: Tip removing rust from garden tools
(Mybusyretiredlife.com All Rights Reserved)
(Mybusyretiredlife.com All Rights Reserved)
(Mybusyretiredlife.com All Rights Reserved)
(Mybusyretiredlife.com All Rights Reserved)

